Bulk Image Converter Online: Convert Images to WebP
One hundred and forty listing photos. Exterior shots, kitchens, bathrooms, floor plans, neighborhood images, agent headshots, and a handful of drone photos mixed into the same folder.
The redesign was nearly ready to launch, but the image library was a problem. Several files came straight from a camera. Others had been downloaded from an old WordPress site. A few were already compressed JPGs with unclear names. Uploading the entire folder as-is would have recreated the same slow gallery pages the redesign was meant to fix.
That is when a bulk image converter online becomes useful. Not because converting a file extension is difficult, but because handling many images without a plan creates duplicates, broken naming, oversized uploads, and avoidable quality loss.
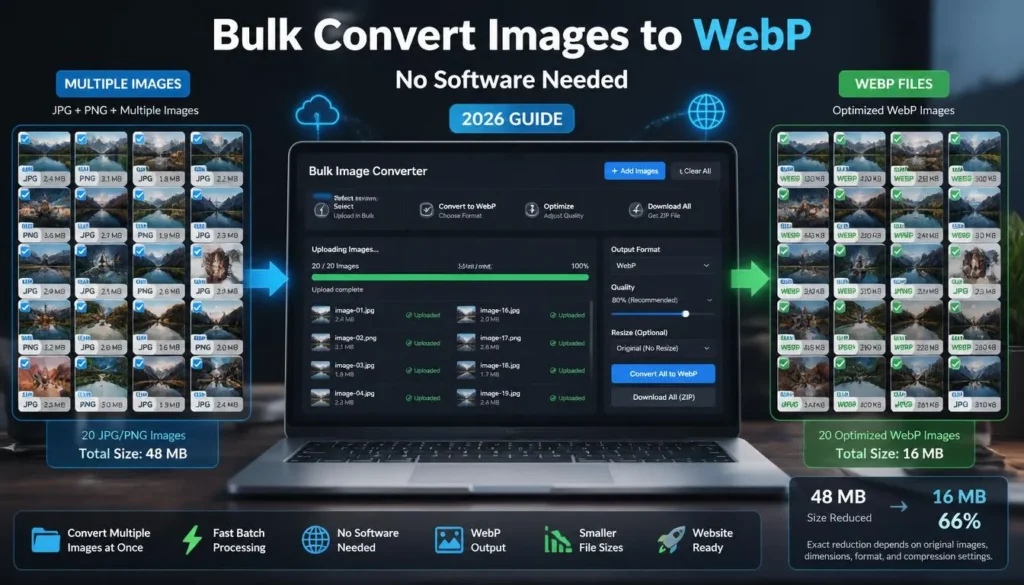
The fastest workflow is to sort the files first, prepare them for their actual page locations, then convert selected batches to WebP in the browser. You avoid installing software, keep the originals intact, and end up with image files that are easier for browsers to deliver.
WebP supports both lossy and lossless compression. It can also support transparency and animation, which gives it more flexibility than a basic photo-only format. MDN’s WebP overview describes WebP as an image format with both lossy and lossless compression.
Why Bulk Conversion Needs a Workflow
Bulk conversion sounds like a simple task:
-
Select files.
-
Convert files.
-
Upload files.
That works for five images. It becomes messy with 50, 100, or 500.
A batch may contain different image types with different purposes:
-
Large hero images
-
Product photos
-
Property galleries
-
Blog featured images
-
Portraits
-
Logos
-
Screenshots
-
Floor plans
-
Maps
-
Transparent graphics
-
Decorative background images
Those files should not always receive the same treatment.
A sharp floor plan with fine labels may need lossless handling or a PNG source. A full-width exterior photo can usually use lossy WebP. A transparent logo should not be treated like a camera photo. A product thumbnail does not need the same dimensions as a homepage banner.
The best bulk workflow handles similar files together. It does not force every image through one export setting because they happened to be in the same folder.
What to Sort Before You Convert
Take a few minutes to sort your images before uploading them to a bulk image converter online.
This saves more time than it costs.
Separate originals from working copies
Create an archive folder for your original source files.
For example:
real-estate-site/

├── originals/

├── selected-for-site/

├── webp-ready/

├── social-media/

└── client-delivery/
The original folder might include camera JPGs, client-supplied PNGs, high-resolution exports, or files downloaded from an old website.
Do not overwrite these files.
Your WebP versions are delivery assets. They belong in a separate folder because you may later need a different crop, a larger export, a print version, or a JPG copy for a listing platform that does not accept WebP.
Group images by purpose
Do not batch a logo, a floor plan, and 30 exterior photos together.
Instead, create purpose-based groups such as:
-
Homepage hero images
-
Property gallery photos
-
Agent portraits
-
Blog images
-
Product photos
-
Screenshots and UI images
-
Logos and transparent assets
-
Social-media exports
This allows you to apply suitable dimensions and quality checks to each group.
For a real-estate site, exterior and interior photos may all use a similar WebP approach. Floor plans need more caution because small room labels and lines can look soft if you apply aggressive lossy compression.
Remove duplicates and obvious rejects
This step is easy to skip when a deadline is close. It is also where a lot of media-library clutter begins.
Before conversion, remove:
-
Near-identical duplicates
-
Unused angles
-
Blurry images
-
Test exports
-
Random screenshots
-
Old versions with unclear names
-
Crops that no longer match the redesign
-
Images with watermark or licensing issues
-
Files intended only for print or social media
You do not need to optimize an image that should not be uploaded in the first place.
The Best Bulk Image Conversion Workflow
The following process works for WordPress sites, product catalogs, portfolio galleries, blogs, client projects, and other image-heavy websites.
1. Audit image dimensions first
Image dimensions usually matter as much as file format.
A 5,000-pixel-wide camera photo converted to WebP may be smaller than the original JPG, but it can still be far too large for a page card that displays the image at 400 pixels wide.
Check where each batch will appear.
Do not assume that a site’s original image size is automatically correct. Inspect your WordPress theme, page builder, or frontend layout to see how wide the image actually displays.
For responsive sites, browsers can choose among multiple image sizes when a proper responsive image setup is available. The srcset approach allows the browser to select an appropriate resolution for the device and display situation. MDN’s responsive-images guide
That does not mean you should upload massive originals without thinking. Starting with sensible source dimensions still makes every later step easier.
2. Resize by image group
Resize your files before conversion when possible.
A homepage hero image may need a wide crop. A gallery image may need a consistent landscape or portrait ratio. A product thumbnail may need a square canvas. A blog image may need a moderate width that suits the article column.
Resizing first helps because you are not compressing pixels you never plan to display.
For example:
-
A full-width property banner may need a large landscape version.
-
A three-column listing card may need a much smaller landscape version.
-
A mobile-first card may work better with a slightly tighter crop.
-
A floor plan might need higher dimensions than an ordinary photo because visitors may need to zoom in.
If you only make one version per image, choose dimensions based on the largest realistic display location. If your CMS supports responsive image generation, it can create smaller variants from that prepared source.
3. Run a small test batch
Never process the whole folder first.
Choose three to five representative files:
-
One detailed exterior or product photo
-
One dark interior photo
-
One image with fine patterns or foliage
-
One image with text, labels, or signage
-
One screenshot or floor plan if your batch contains them
Convert these samples to WebP and inspect them before starting the full bulk run.
Look for:
-
Soft text or labels
-
Strange texture in grass, brick, fabric, or hair
-
Visible banding in skies or shadows
-
Color shifts
-
Loss of detail in dark areas
-
Cropping problems
-
A file size that is still too large for the intended location
This short test is where you find the quality setting that works for the actual content—not a generic setting copied from another site.
4. Convert similar images in manageable batches
Once the test files look right, process similar images together.
For example:
-
Batch one: property or product photos
-
Batch two: blog photos
-
Batch three: image-heavy landing-page visuals
-
Batch four: screenshots and diagrams
-
Batch five: transparent graphics, if WebP is appropriate for them
For ordinary website photography, you can batch-convert prepared images into WebP files in your browser without downloading desktop conversion software.
Keep batch sizes practical. A folder of 20 to 40 files is easier to review and recover if something goes wrong than one huge folder of 300 images. The ideal number depends on file sizes and your connection, but smaller batches make it easier to spot an accidental duplicate or a file that needs different handling.
5. Name files before uploading
A WebP file should have a meaningful name before it reaches your media library.
Avoid names such as:
IMG_8832.webp

DSC_2001-final-new.webp

image-45.webp

photo-copy-copy.webp
Use names that describe the image honestly:
modern-kitchen-island.webp

four-bedroom-home-exterior.webp

real-estate-agent-headshot.webp

two-bedroom-floor-plan.webp

wordpress-property-listing-dashboard.webp
Descriptive filenames help you manage the media library later. They also make it easier for a team member to identify the right file during an update.
Keep the names natural. Do not turn every filename into a long string of search terms.
6. Check one full batch before uploading
Open a selection of the finished WebP files after conversion.
You do not need to inspect every image at extreme zoom, but you should review enough files to catch an incorrect setting or a bad source folder.
Check:
-
A light image
-
A dark image
-
A highly detailed image
-
An image with text
-
A portrait
-
A wide landscape
-
A transparent asset, if included
Pay attention to the intended display size. A WebP image can look different at 100% zoom on a large monitor than it does inside a 350-pixel listing card on a phone.
The meaningful question is not, “Can I see any difference at 400% zoom?” It is, “Does this look good where visitors will actually see it?”
7. Upload with a clear WordPress plan
Before uploading, know how your WordPress site handles WebP.
Some sites accept WebP directly and generate image sizes normally. Others use an optimization plugin or CDN that creates WebP copies automatically from JPG or PNG uploads. Some older setups need updates, configuration changes, or server support.
Do not mix workflows without a reason.
If your plugin already generates and serves WebP versions from your existing JPG files, manually uploading another full set of WebPs may create duplicates. If you are manually managing WebP assets, keep source originals in a local project archive rather than uploading every format to the media library.
Test one converted image first. Add it to a draft page, inspect it on desktop and mobile, clear relevant caches, and confirm that the published page displays the correct file.
Image Types That Need Different Treatment
Bulk conversion works best when you know which assets should not be handled like ordinary photos.
Screenshots and dashboards
Screenshots often contain small labels, buttons, tables, code, and thin borders.
Lossy WebP can work, but test it carefully. If text turns soft or lines become unclear, use lossless WebP or retain PNG. For documentation, tutorials, and support articles, readability is usually more valuable than chasing the smallest file.
Floor plans, maps, and diagrams
These images can contain fine lines, room dimensions, symbols, and small type.
A lossy setting that looks fine on a kitchen photo may make a floor plan difficult to read. Keep a higher-quality version, use lossless WebP where available, or retain PNG if that is the clearer result.
Logos and transparent graphics
WebP can support transparency, but SVG or PNG may still be better for many logos and interface assets.
Use SVG when you have a genuine vector logo and your site supports it safely. Use PNG when you need a transparent raster logo with predictable compatibility. Use lossless WebP only after testing it in your theme, page builder, email workflow, and any external platforms that reuse the asset.
Photos with visible text
A storefront photo with a large sign may tolerate lossy WebP well. A product image with a tiny ingredients label may not.
Inspect text inside photos carefully. If visitors need to read it, use a higher-quality setting or create a separate close-up image.
Common Bulk Conversion Mistakes
Converting every image with one quality setting
A clean studio product image, a dark restaurant interior, a detailed aerial photo, and a floor plan respond differently to compression.
Use representative test files and separate image groups before committing to a large batch.
Converting without resizing
Format conversion can reduce weight, but it does not replace sensible dimensions.
Do not convert a 6,000-pixel image to WebP and assume the job is finished. Resize based on the largest real display location, then convert.
Replacing your only originals
Never delete your source JPG, PNG, HEIC, or design export after creating WebP copies.
A new website section, print request, marketplace upload, or social crop may require a different format or a higher-resolution source later.
Uploading duplicates to WordPress
Uploading photo.jpg, photo.png, and photo.webp for every image creates confusion unless your site needs all of them.
Choose one published workflow. Keep master files outside the public media library.
Forgetting thumbnails and old images
Bulk conversion is not only about the hero images.
Category thumbnails, related-post cards, gallery previews, featured images, author images, and old in-content photos can collectively add substantial weight to a page. Prioritize the pages people visit most, then work through the supporting image groups.
Ignoring cache after replacement
If you replace images on a live site and keep seeing the old version, your browser cache, WordPress caching plugin, CDN, or image optimizer may be serving an older file.
Clear the appropriate cache before deciding the conversion failed.
When an Online Bulk Converter Is Not Enough
An online workflow is ideal for occasional batches and normal content work. There are situations where you may want a more technical process.
Consider a local script, image pipeline, CDN transformation service, or build tool if you:
-
Manage thousands of product images
-
Need automatic crops in several aspect ratios
-
Require exact quality settings by image type
-
Build a static site with automated deployment
-
Need image optimization to run during every CMS upload
-
Manage several sites with the same image standards
-
Need advanced metadata stripping, watermarking, or conditional delivery
For most bloggers, small businesses, agency sites, and WordPress projects, that level of automation is unnecessary at first. A carefully managed browser batch is often faster than building a complex system you will not maintain.
Start with a repeatable process. Automate only after the volume justifies it.
Read also: WebP Not Supported? How to Open and Convert Files
FAQ
Can I bulk convert images to WebP online for free?
Yes. Browser-based image converters can process multiple JPG or PNG images into WebP without installing desktop software. The exact batch size and options depend on the tool, but the workflow is well suited to small and medium website-image batches.
Keep original files separately and use converted WebP files as website delivery copies.
Should I convert JPG and PNG files to WebP in the same batch?
You can, but it is better to separate them when their content differs.
Photographic JPG files often work well with lossy WebP. PNG files may be screenshots, logos, diagrams, or transparent assets that need lossless handling or more careful testing. Grouping by content gives you better control.
Does bulk WebP conversion reduce image quality?
Lossy WebP conversion can remove some image information, but a sensible quality setting often keeps the result visually strong at normal page size. Lossless WebP preserves image data but may create larger files.
Test representative images first, then inspect the finished files in the actual website layout.
Can I bulk convert images for WordPress?
Yes, but first check how your WordPress site handles images. Modern WordPress installations generally support WebP uploads, while some optimization plugins and CDNs generate WebP automatically from existing JPG or PNG files.
Avoid uploading duplicate formats until you know which workflow your site uses.
What is the best image size before converting to WebP?
Use dimensions that fit the largest real location where the image will appear. A homepage hero needs more width than a blog image or product thumbnail. Do not upload full camera resolution if the page never displays it.
Your theme, page builder, and responsive image setup affect the final answer, so test a few representative images in the live layout.
Convert in Batches, Not Blindly
The best bulk image conversion process is not “select every file and press convert.”
Sort your images. Preserve originals. Resize according to layout. Test a representative batch. Convert similar assets together. Review the results before uploading.
Once you work that way, an online bulk converter becomes a practical part of your content workflow rather than another source of duplicate files and unclear image versions.