How to Resize Your Photo for Online Job & Visa Applications
You have the right photo, the application deadline is close, and the upload form rejects it. Maybe the file is too large. Maybe it is too small. Sometimes the problem is the format, dimensions, or crop not the picture itself.
To reduce image size for job application uploads without creating a blurry result, treat the portal’s rules as the final authority. A good looking photo can still fail if it is a PNG when the form wants JPG, a square when the portal needs portrait orientation, or 2MB when the limit is 200KB.
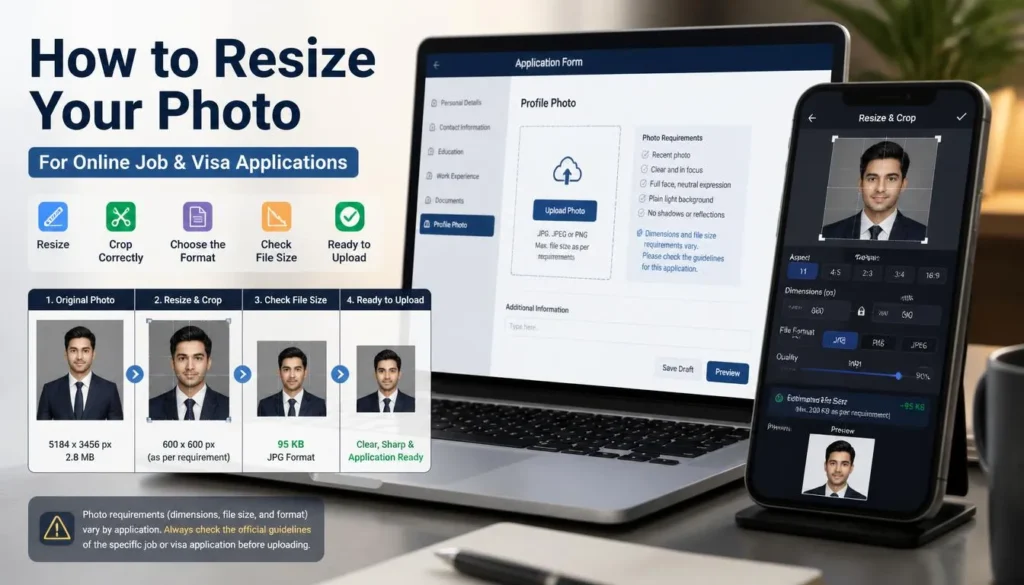
The safest workflow is straightforward: check the exact requirements, start with the original file, crop carefully, resize to the requested pixel dimensions, then compress only enough to meet the file size limit.
Check the Application Requirements First
Do not use one resized image for every job or visa application.
Upload specifications vary widely. Some portals require a square JPG under 240KB. Others require a vertical JPG with a much larger allowed file size. A site may also set a minimum file size, minimum dimensions, or a specific head and shoulders composition.
For example, one online visa system may require a square JPEG between 600 × 600px and 1,200 × 1,200px, with a maximum size of 240KB. Another may require a vertical JPG at least 600px wide and 750px tall, between 50KB and 6MB. Those differences are why an image accepted on one application can be rejected by the next one.
Before editing, write down the portal’s requirements:
-
Accepted format: JPG, JPEG, PNG, or another listed type
-
Maximum and minimum file size
-
Required width and height in pixels
-
Required orientation: square, portrait, or landscape
-
Required aspect ratio, such as 1:1 or 3:4
-
Photo age requirement, if stated
-
Background, head position, expression, and clothing rules
-
Whether the image must be in color
If the portal provides a photo checker or preview step, use it. It can catch a technical mismatch before you submit the full application.
How to Reduce Image Size for Job Application Uploads
1. Start with the original photo
Use the highest quality source photo you have.
A photo that has been sent through a messaging app, screenshotted, posted to social media, and downloaded again may already be compressed. It can still look acceptable on a phone screen, but resizing it for a strict form often makes its weak points obvious: grainy backgrounds, smudged hair, harsh edges, or patchy skin tones.
Keep your original in a safe folder. Create new copies for each application, using names that make the requirements clear:
-
job-profile-600x600-180kb.jpg -
visa-photo-750x1000-300kb.jpg -
application-headshot-3x4.jpg
This prevents accidental uploads of the wrong version when you are handling several forms at once.
2. Crop for the required composition
Crop before you resize.
For a professional job application photo, use a clear head and shoulders framing unless the employer asks for something different. Keep the face well lit, centered, and easy to recognize. A neutral or natural expression is usually safer than a dramatic pose or heavily filtered selfie.
For visa applications, the rules can be more specific. Many require a plain light background, a direct forward facing view, and a head that occupies a defined part of the frame. Do not crop tightly just to save file size if it changes the required head position or removes necessary space around the top of the head.
A useful check: imagine the form reviewer seeing only a small preview. Your face should remain centered and clearly visible without distractions from a cluttered room, car interior, or busy outdoor background.
3. Resize to the required pixel dimensions
Pixel dimensions matter more than most people expect.
A recent iPhone or Android photo can be over 3,000px wide. That is far more detail than many job portals need, and it often makes the file unnecessarily large. Resize to the portal’s exact dimensions when they are provided.
Use the application’s numbers, not generic advice. If a form requires a 600 × 600px image, export exactly 600 × 600px. If it requires a vertical photo at least 600 × 750px, retain the requested portrait shape rather than turning the image into a square.
These are common patterns, but the portal’s own instructions always win:
If you are preparing several general web versions for job sites or profile platforms, you can convert your images directly in the browser and keep clearly labeled JPG copies at each size.
4. Use JPG when compatibility matters
JPG or JPEG is usually the safest output format for applications.
It is widely accepted, efficient for photographs, and easy to keep under strict file size limits. WebP is often excellent for websites, but many official and corporate portals do not accept it. PNG may preserve a clean edge, but a full color portrait saved as PNG can be larger than necessary.
Use this quick rule:
-
Choose JPG for most job, visa, school, scholarship, and government application photos
-
Choose PNG only if the portal requests it or you need transparency
-
Choose WebP for websites only when the platform supports it
If a form says JPEG only, do not upload a file renamed from .webp to .jpg. The internal file format still matters, and the upload validator may reject it.
5. Compress gently after resizing
Once your dimensions are correct, reduce file size with moderate compression.
For a professional portrait, start with JPG quality around 80–85. A plain background and a properly cropped headshot often reach a reasonable size without aggressive compression. If the file is still too large, lower the quality in small increments or reduce the dimensions only if the portal permits it.
Look closely at these areas after export:
-
Eyes and eyelashes
-
Hairline and loose hair
-
Edges of glasses
-
Jawline and ears
-
Shirt collar or clothing texture
-
Smooth background areas
Those are the first places compression artifacts become noticeable. If the skin looks plastic or the hair becomes blocky, go back one step. Reduce dimensions a little, then export at a slightly higher quality rather than pushing the quality setting too low.
When you need to make a clean JPG, PNG, or WebP copy while keeping control over the format, our free image conversion tool can help you create a browser based export.
6. Leave room below the maximum file size
Do not aim exactly at the upload limit.
If the portal says 200KB maximum, target roughly 180–190KB. If it allows 300KB, try to stay below about 280KB. This buffer helps avoid rejection caused by strict validation or file size rounding.
The same principle applies to minimum limits. If a system requires a photo larger than 50KB, do not export one that sits at 50KB exactly. Use a little margin so that the file remains clearly within the accepted range.
7. Test the final file before submission
Open the final export yourself before you upload it.
Check the file name, dimensions, format, and size. Then view the image at around the size it is likely to appear in the application. A photo can look sharp when viewed full screen but be poorly framed in a small upload preview.
For visa applications, review the visual requirements one more time. Make sure the image is recent if required, has the right background, shows the full face clearly, and is not mirrored, heavily filtered, or altered in a way the authority forbids.
Do not rely only on an upload field accepting the file. Some systems accept the image first and reject the application later during validation.
Common Mistakes That Cause Rejections
Using a photo from a messaging app
Messaging apps often resize and recompress pictures automatically. The file may be small enough, but it can lack the detail needed for a clean application image.
Start from the original camera photo or a professionally taken digital file whenever possible.
Changing the file extension instead of converting it
Renaming photo.png to photo.jpg does not turn it into a true JPG file.
If the upload requires JPEG, export or convert the image as JPEG. A proper conversion changes the image encoding; a renamed extension only changes the label.
Shrinking dimensions too far
A tiny file may meet the maximum file size rule but fail the minimum pixel requirement. For example, if a form requests 600 × 600px, a 250 × 250px image is not a valid substitute, even if it is crisp and only 20KB.
Follow the required dimensions first. Then optimize the file size.
Over compressing the photo
Aggressive JPG compression can make a headshot look unprofessional. Faces are especially unforgiving: compression tends to soften eyelashes, create uneven skin tones, and leave blocky edges around hair.
If the file is too large, check crop and pixel dimensions before using a very low quality setting.
Reusing a visa photo for every application
Requirements differ by country, visa category, and platform. A square image accepted by one service may fail another that requires a vertical 3:4 image, a different head size, or a minimum file size.
Create a dedicated version for each application and label it clearly.
A Quick Example: 3MB Phone Photo to a Visa Upload
Suppose you have a 3MB phone photo and a visa portal requires a square JPG, at least 600 × 600px, under 240KB.
-
Start with the original photo, not a social media download.
-
Crop it to a square while preserving the required head position and background.
-
Resize it to 600 × 600px.
-
Export as JPG at quality 85.
-
Check the file size.
-
If it exceeds 240KB, try quality 80.
-
If necessary, use a modestly lower quality setting while keeping the required 600 × 600px dimensions.
-
Inspect the face, hair, background, and orientation before uploading.
-
Save the final image around 210–225KB rather than exactly 240KB.
That process is much more reliable than lowering the quality on the original 3MB image and hoping the portal accepts it.
FAQ
What is the best photo size for a job application?
There is no universal size. Many job portals accept square or portrait JPG files, but the required dimensions and maximum file size vary. Use the exact specifications shown on the application page. If none are given, a clear JPG headshot around 600–1,000px wide is usually a practical starting point.
Can I use a selfie for a job or visa application?
A clear, well lit selfie may be accepted by some job portals, but it must still look professional and meet the stated requirements. For visa applications, follow the authority’s photo rules closely. Avoid filters, wide angle distortion, shadows, mirror images, and distracting backgrounds.
Should I use JPG, PNG, or WebP for a visa photo?
Use JPG or JPEG unless the application specifically requests another format. JPG is the most commonly accepted format for visa and official application portals. WebP may be smaller, but it is not universally supported. PNG is often unnecessarily large for a full color portrait.
Why is my application photo still too large after resizing?
The file may use PNG format, have a high JPG quality setting, include a detailed background, or retain more pixels than the portal needs. Confirm the required dimensions, crop unused space, export as JPG, and lower quality gradually.
Does DPI matter for an online job or visa application?
Usually, pixel dimensions, file format, and file size matter more than DPI for an online upload. If the portal specifies DPI, follow it. Otherwise, focus on the required width, height, crop, and file size.
Prepare Your Upload Ready Photo
To reduce image size for job application and visa uploads safely, match the portal’s dimensions first, use JPG when compatibility matters, and compress only enough to clear the file size limit. For job profiles and web uploads that need a lighter file, try the conversion tool here to create a correctly formatted JPG, PNG, or WebP version before you submit.